Setup
I will now begin the guide to setting up Kodi and its addons. I recommend that the initial setup is completed on your laptop or desktop. Once it has been setup, you can do a backup to export to another device.
Downloading Kodi
Here are the instructions for each platform, if you are viewing on a mobile phone, you will need to scroll horizontally to see all the different platform instructions.
- PC
- Android
- Apple (Not recommend)
- Apple TV
- Fire TV
- webOS (LG Smart TV)
- Raspberry Pi
Go to Kodi download page and dowloand the right package for your os
If you need help determining which package to download, refer to the following:
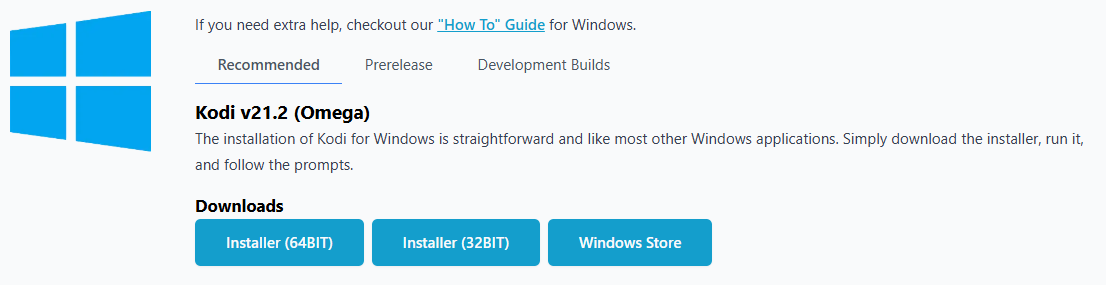
For Windows dowload the following:
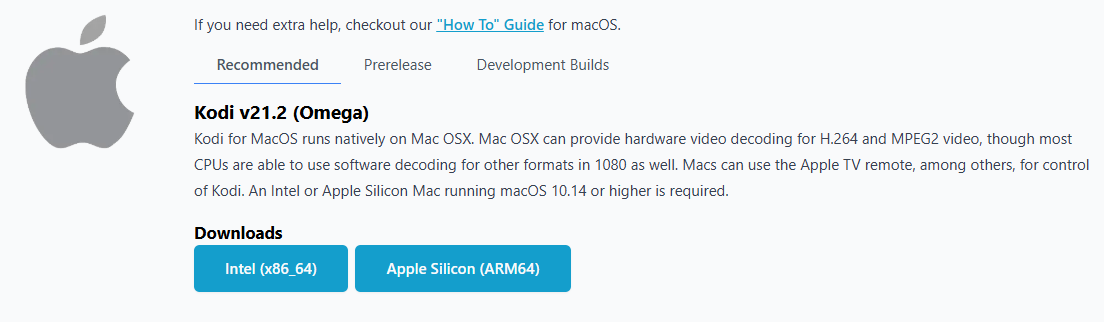
For Mac OS, download one of the following depending on your version of Mac OS:
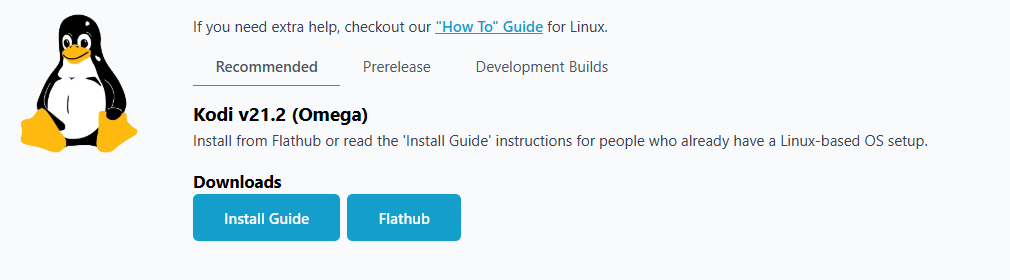
For Linux, download the flathub one following their guide depending which linux distributions you have:
Kodi can be installed on mobile throught Google Play
Also, it is in Huawei store, for those who use new Huawei models without google services.

- ARM (armeabi-v7a) - 32 bit
- ARM64 (arm64-v8a) - 64 bit
Kodi is not available on the App Store, so it must be installed through sideloading.
I recommend skipping this step and using better alternatives like Fusion or Omni.
Choose one of the methods below to install Kodi on your iOS device.
Jailbroken device method
If your device is not jailbroken, please follow one of the methods given in Non-jailbroken devices section
Install Kodi via Cydia - (Kodi releases are available on the default BigBoss repository.)
-
Open Cydia on your iOS device.
-
Open the "Search" tab
-
Enter "Kodi" in the search field and touch the Kodi version corresponding to your device.
-
Touch "Modify".
-
Touch "Install".
-
Touch "Confirm".
-
Wait until the "Return to Cydia" button appears and touch it.
And you're done! You should now be running Kodi v21.2 Omega for iOS. Enjoy!
Non-jailbroken devices
Sideload a self signed .ipa file
Currently, these methods require that Kodi be re-installed every 7 days if you are using a free iOS dev account.
Pre-requisites:
Converting the .deb to .ipa:
Before beginning the installation, you have to convert .deb file of Kodi into .ipa. If you already know how to convert .deb into .ipa, you can skip to the installation methods below.
- Right Click on .deb file of Kodi that you downloaded on your PC and Select 7-zip > Extract files. Click OK in the next Window.
- Open the resulting Folder and you will find data.tar file inside. Simply extract data.tar file with Right Click > 7-zip > Extract Files.
- Now you should have data folder and data.tar file in the folder.
- Go inside the data folder and open Applications folder. Here you will find a folder named Kodi.app.
- Here create a new folder and name it “Payload” without quotes. Now you should have 2 folders. Payload and Kodi.app folder. Make sure that the P is capital in Payload.
- Now simply drag the Kodi.app folder and drop it on top of the Payload folder. In other words, copy kodi.app and paste it inside Payload folder.
- Next you have to Right-click the Payload folder and Click 7-zip > Add to archive option.
- A new window will pop up. Here you have to make sure that the Archive format is set to zip and name the archive ending with .ipa . Something like Kodi.ipa. After that click OK.
Now you should have your kodi.ipa file ready for installation.
Installing Kodi using Sideloadly
Download Sideloadly and install it on your PC.
Sideloadly is still a work-in-progress and there might be some bugs that you face while installing Kodi.
- Connect your iDevice with your computer, and make sure that it is turned ON. If iTunes or some other program pops up then close that first.
- Open Sideloadly and check your device is detected. Enter your Apple account, choose your Kodi ipa file and press Start button. You will be asked to enter your Apple account password and verification code. This is required by Sideloadly to sign the ipa file with your own ID.
- Wait until Sideloadly reports process as Done. You’ll be able to see Kodi icon on your iDevice.
- Once you see Kodi icon in your iDevice, go in Settings > General > Profiles & Device management and Trust the Apple ID you used which installation.
- Now you should have kodi working on your iOS device.
Kodi is not available on the App Store, so it must be installed through sideloading.
I recommend skipping this step and using better alternatives like Fusion or Omni.
Apple TV versions supported by Kodi:
- Apple TV 4 (Called "Apple TV HD" by Apple)
- Apple TV 5 (Called "Apple TV 4K" by Apple)
Install from Windows (only for Apple TV 4)
What about the Apple TV 4K?
Unfortunately the Apple TV 4K does not have a USB-C. If you are not jailbroken the only official way to sideload Kodi on your device is to use Xcode on macOS with a wireless connection. To get macOS on your computer you can use a virtual machine or check for building a hackintosh, but we will not discuss this here.
Requirements:
- Cydia Impactor
- Windows 7 or higher
- Latest version of iTunes is needed to be installed.
- Kodi
.debfile for tvOS: Download here (Lastest stable version at the time of writing) - A USB-C cable, without that, you can't connect your Apple TV with computer
Convert .deb to .ipa:
- Right Click on .deb file of Kodi that you downloaded on your PC and Select 7-zip > Extract files. Click OK in the next Window.
- Open the resulting Folder and you will find data.tar file inside. Simply extract data.tar file with Right Click > 7-zip > Extract Files.
- Now you should have data folder and data.tar file in the folder.
- Go inside the data folder and open Applications folder. Here you will find a folder named Kodi.app.
- Here create a new folder and name it “Payload” without quotes. Now you should have 2 folders. Payload and Kodi.app folder. Make sure that the P is capital in Payload.
- Now simply drag the Kodi.app folder and drop it on top of the Payload folder. In other words, copy kodi.app and paste it inside Payload folder.
- Next you have to Right-click the Payload folder and Click 7-zip > Add to archive option.
- A new window will pop up. Here you have to make sure that the Archive format is set to zip and name the archive ending with .ipa . Something like Kodi.ipa. After that click OK.
Install Kodi on your Apple TV
Connect your Apple TV 4 with power and make sure that it is turned ON before proceeding.
- Connect your Apple TV 4 with your computer, and make sure that it is turned ON. If iTunes or some other program pops up then close that first.
- Extract the Impactor zip file somewhere in your computer and Open Impactor.exe. Don’t select “Run as Administrator” for Cydia Impactor.
- Make sure that your Apple TV is detected by Cydia Impactor. After that Drag and drop the Kodi.ipa file in Cydia Impactor.
- Cydia Impactor will ask you to Enter your Apple ID. Enter a Valid Apple ID here and click OK Cydia Impactor will start installing Kodi on your Apple TV.
- Wait for the installation to complete. Once done, simply look for Kodi icon on your Apple TV 4 main screen and Now you can open it.
If you are using a free Apple developper account you will need to do this step every 7 days, so keep your IPA file on your computer
Install from macOS (Apple TV 4 and Apple TV 4K)
The kodi guide for macOS is located here: macOS setup guide. It is better you see that guide.
Kodi is not available on the Amazon Fire TV Appstore, but you can sideload it using the following steps:
-
Enable Apps from Unknown Sources:
- Go to
Settingson your Fire TV. - Select
My Fire TVorDevice. - Choose
Developer Options. - Turn on
Apps from Unknown Sources.
- Go to
-
Install the Downloader App:
- From the Fire TV home screen, go to the
Searchicon. - Type
Downloaderand select the Downloader app from the search results. - Click
Downloadto install the app.
- From the Fire TV home screen, go to the
-
Download Kodi APK:
- Open the Downloader app.
- In the URL field, enter the official Kodi download link:
https://kodi.tv/download. - Select the Android icon and choose the ARMV7A (32BIT) version for Fire TV.
- Click
Downloadto start downloading the Kodi APK file.
-
Install Kodi:
- Once the download is complete, the Downloader app will automatically prompt you to install Kodi.
- Click
Installand wait for the installation to finish. - After installation, you can choose to open Kodi directly or find it later in your Apps section.
Pre-requisites for installing Kodi on webOS (LG Smart TVs):
- Any webOS 4 or later TV (except for K5LP based TVs)
- A computer connected to the same network as your TV
- DevMode manager for webOS
- A Kodi ipk file
Steps to install Kodi on webOS:
-
If unsure choose Developer Mode here. Follow the steps to set up a LG developer account, install the Developer Mode app and turn it on. Alternatively, if your TV is already rooted you can set up the SSH connection instead and skip to step 3.

-
Follow the steps to create a LG developer account, install the developer mode app and enable developer mode.
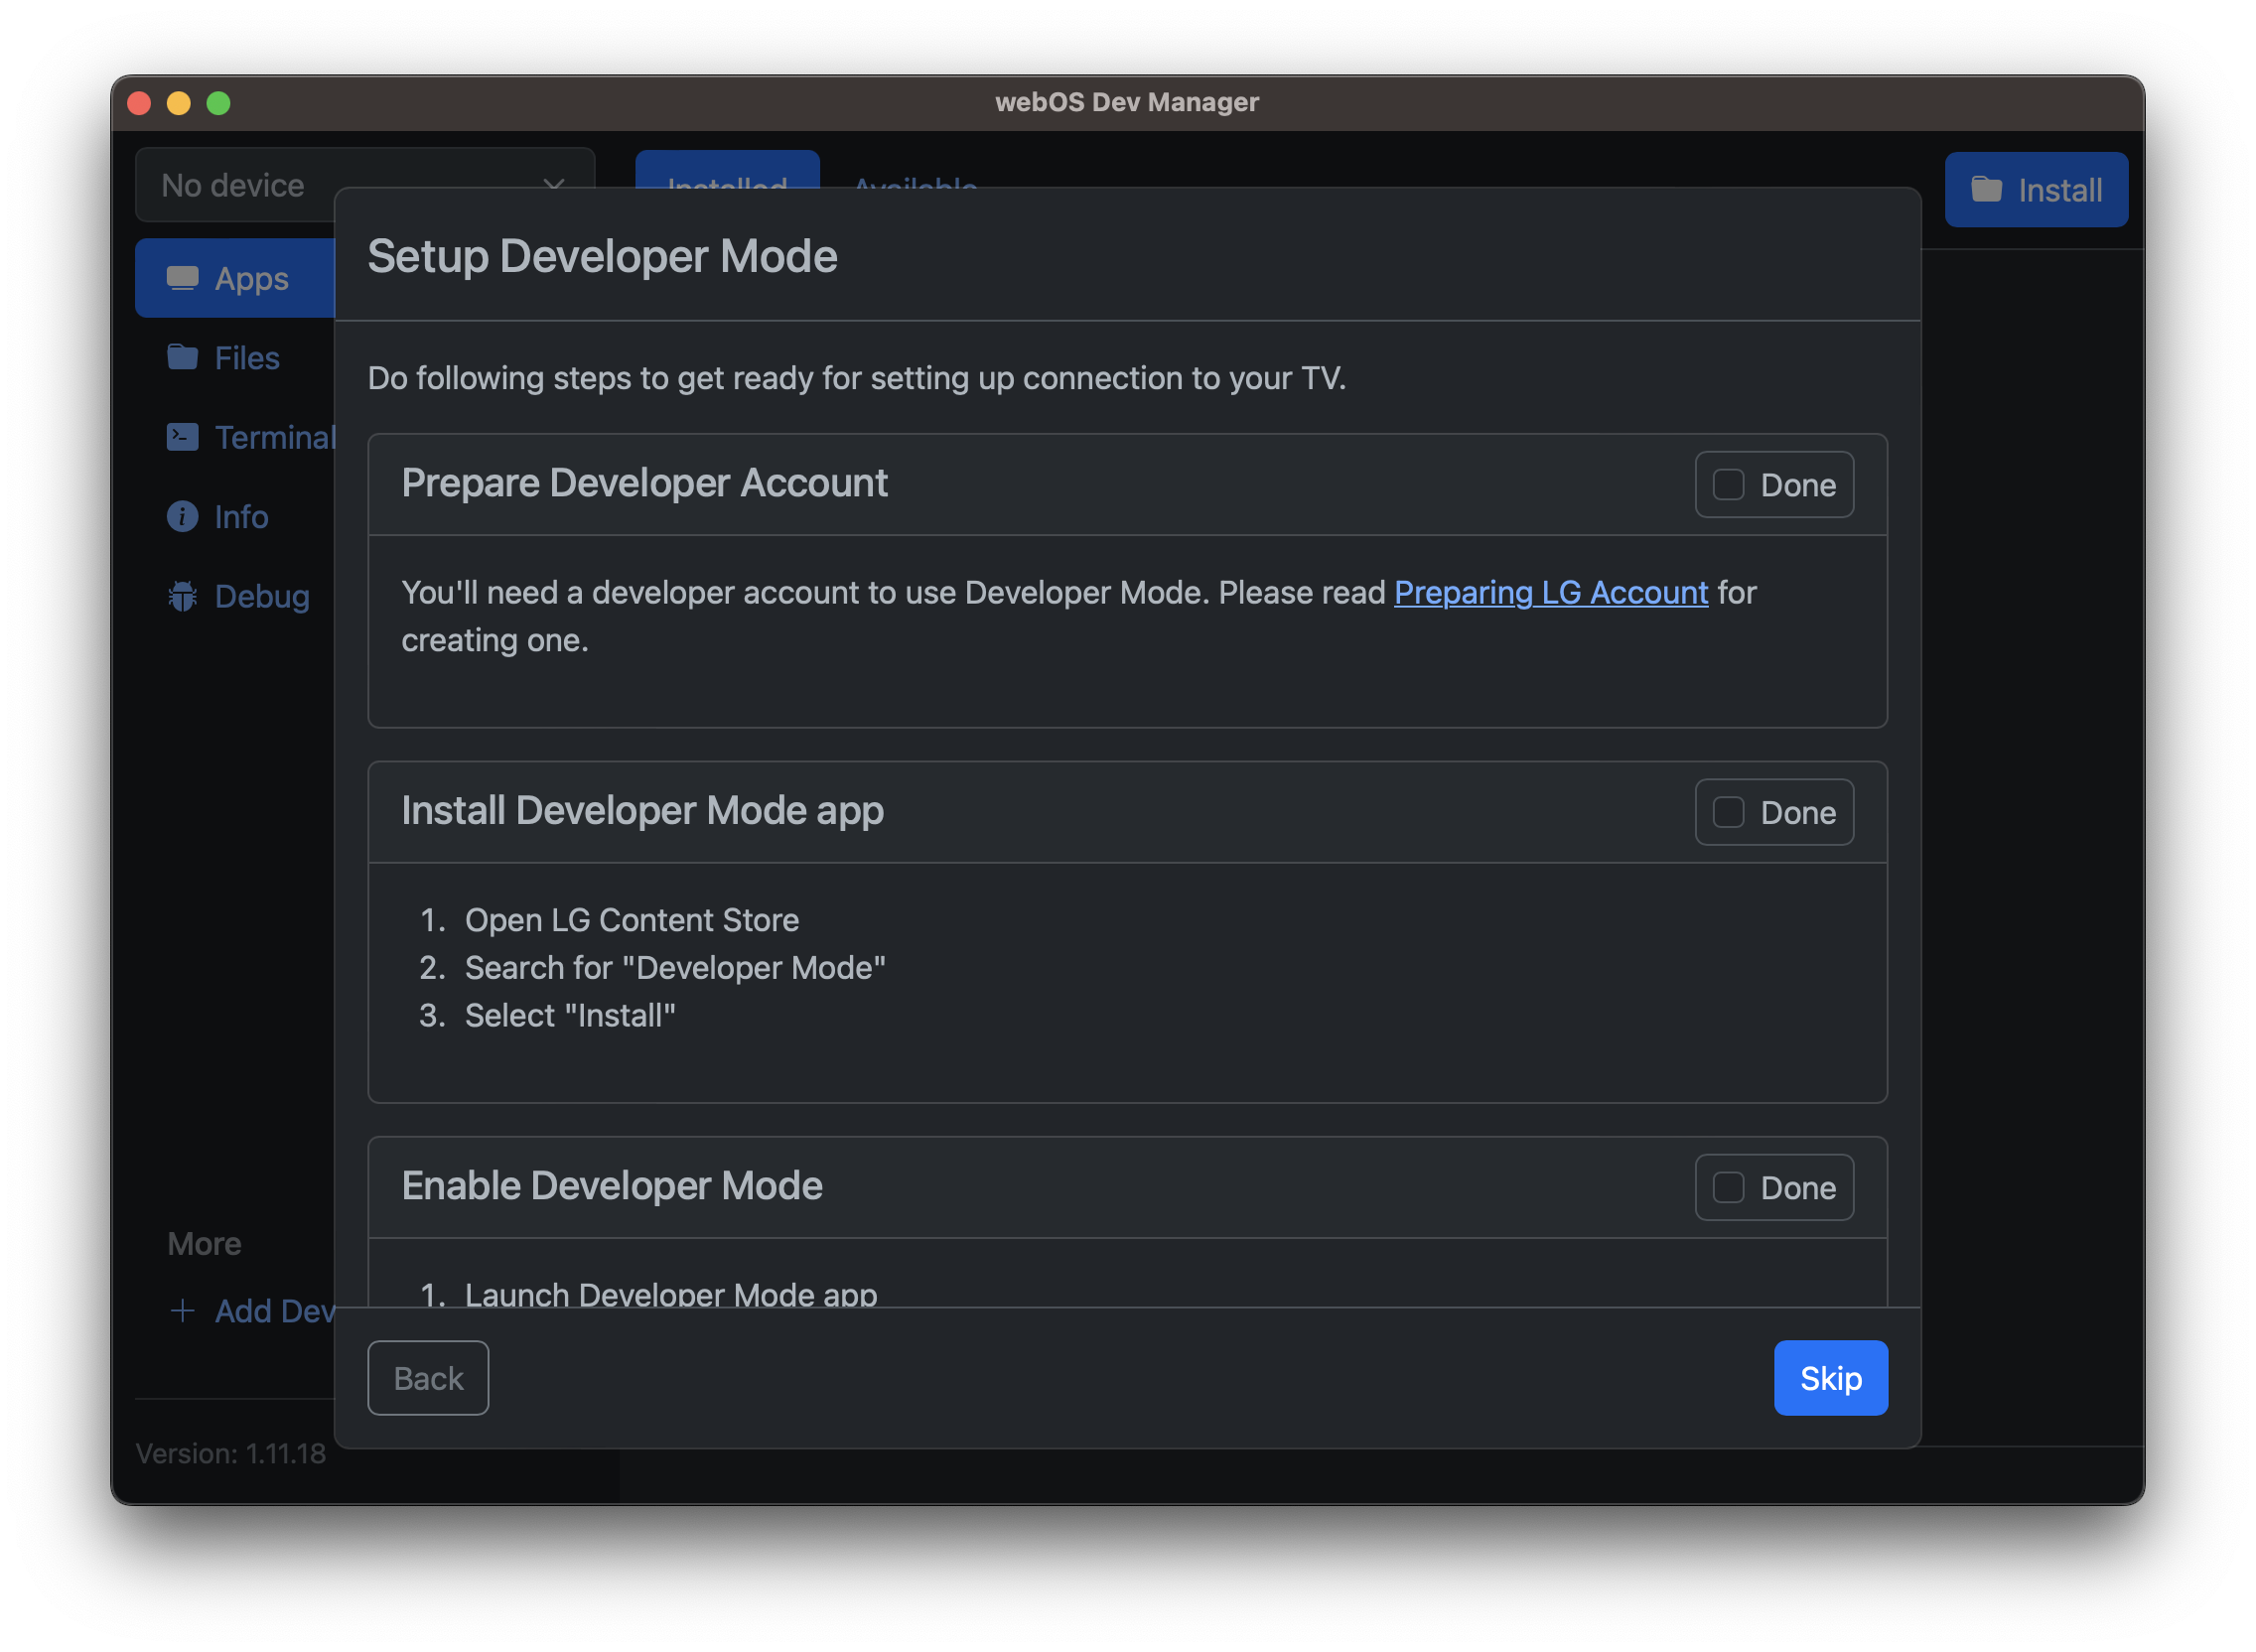
-
Click install and select the Kodi ipk file you downloaded earlier.
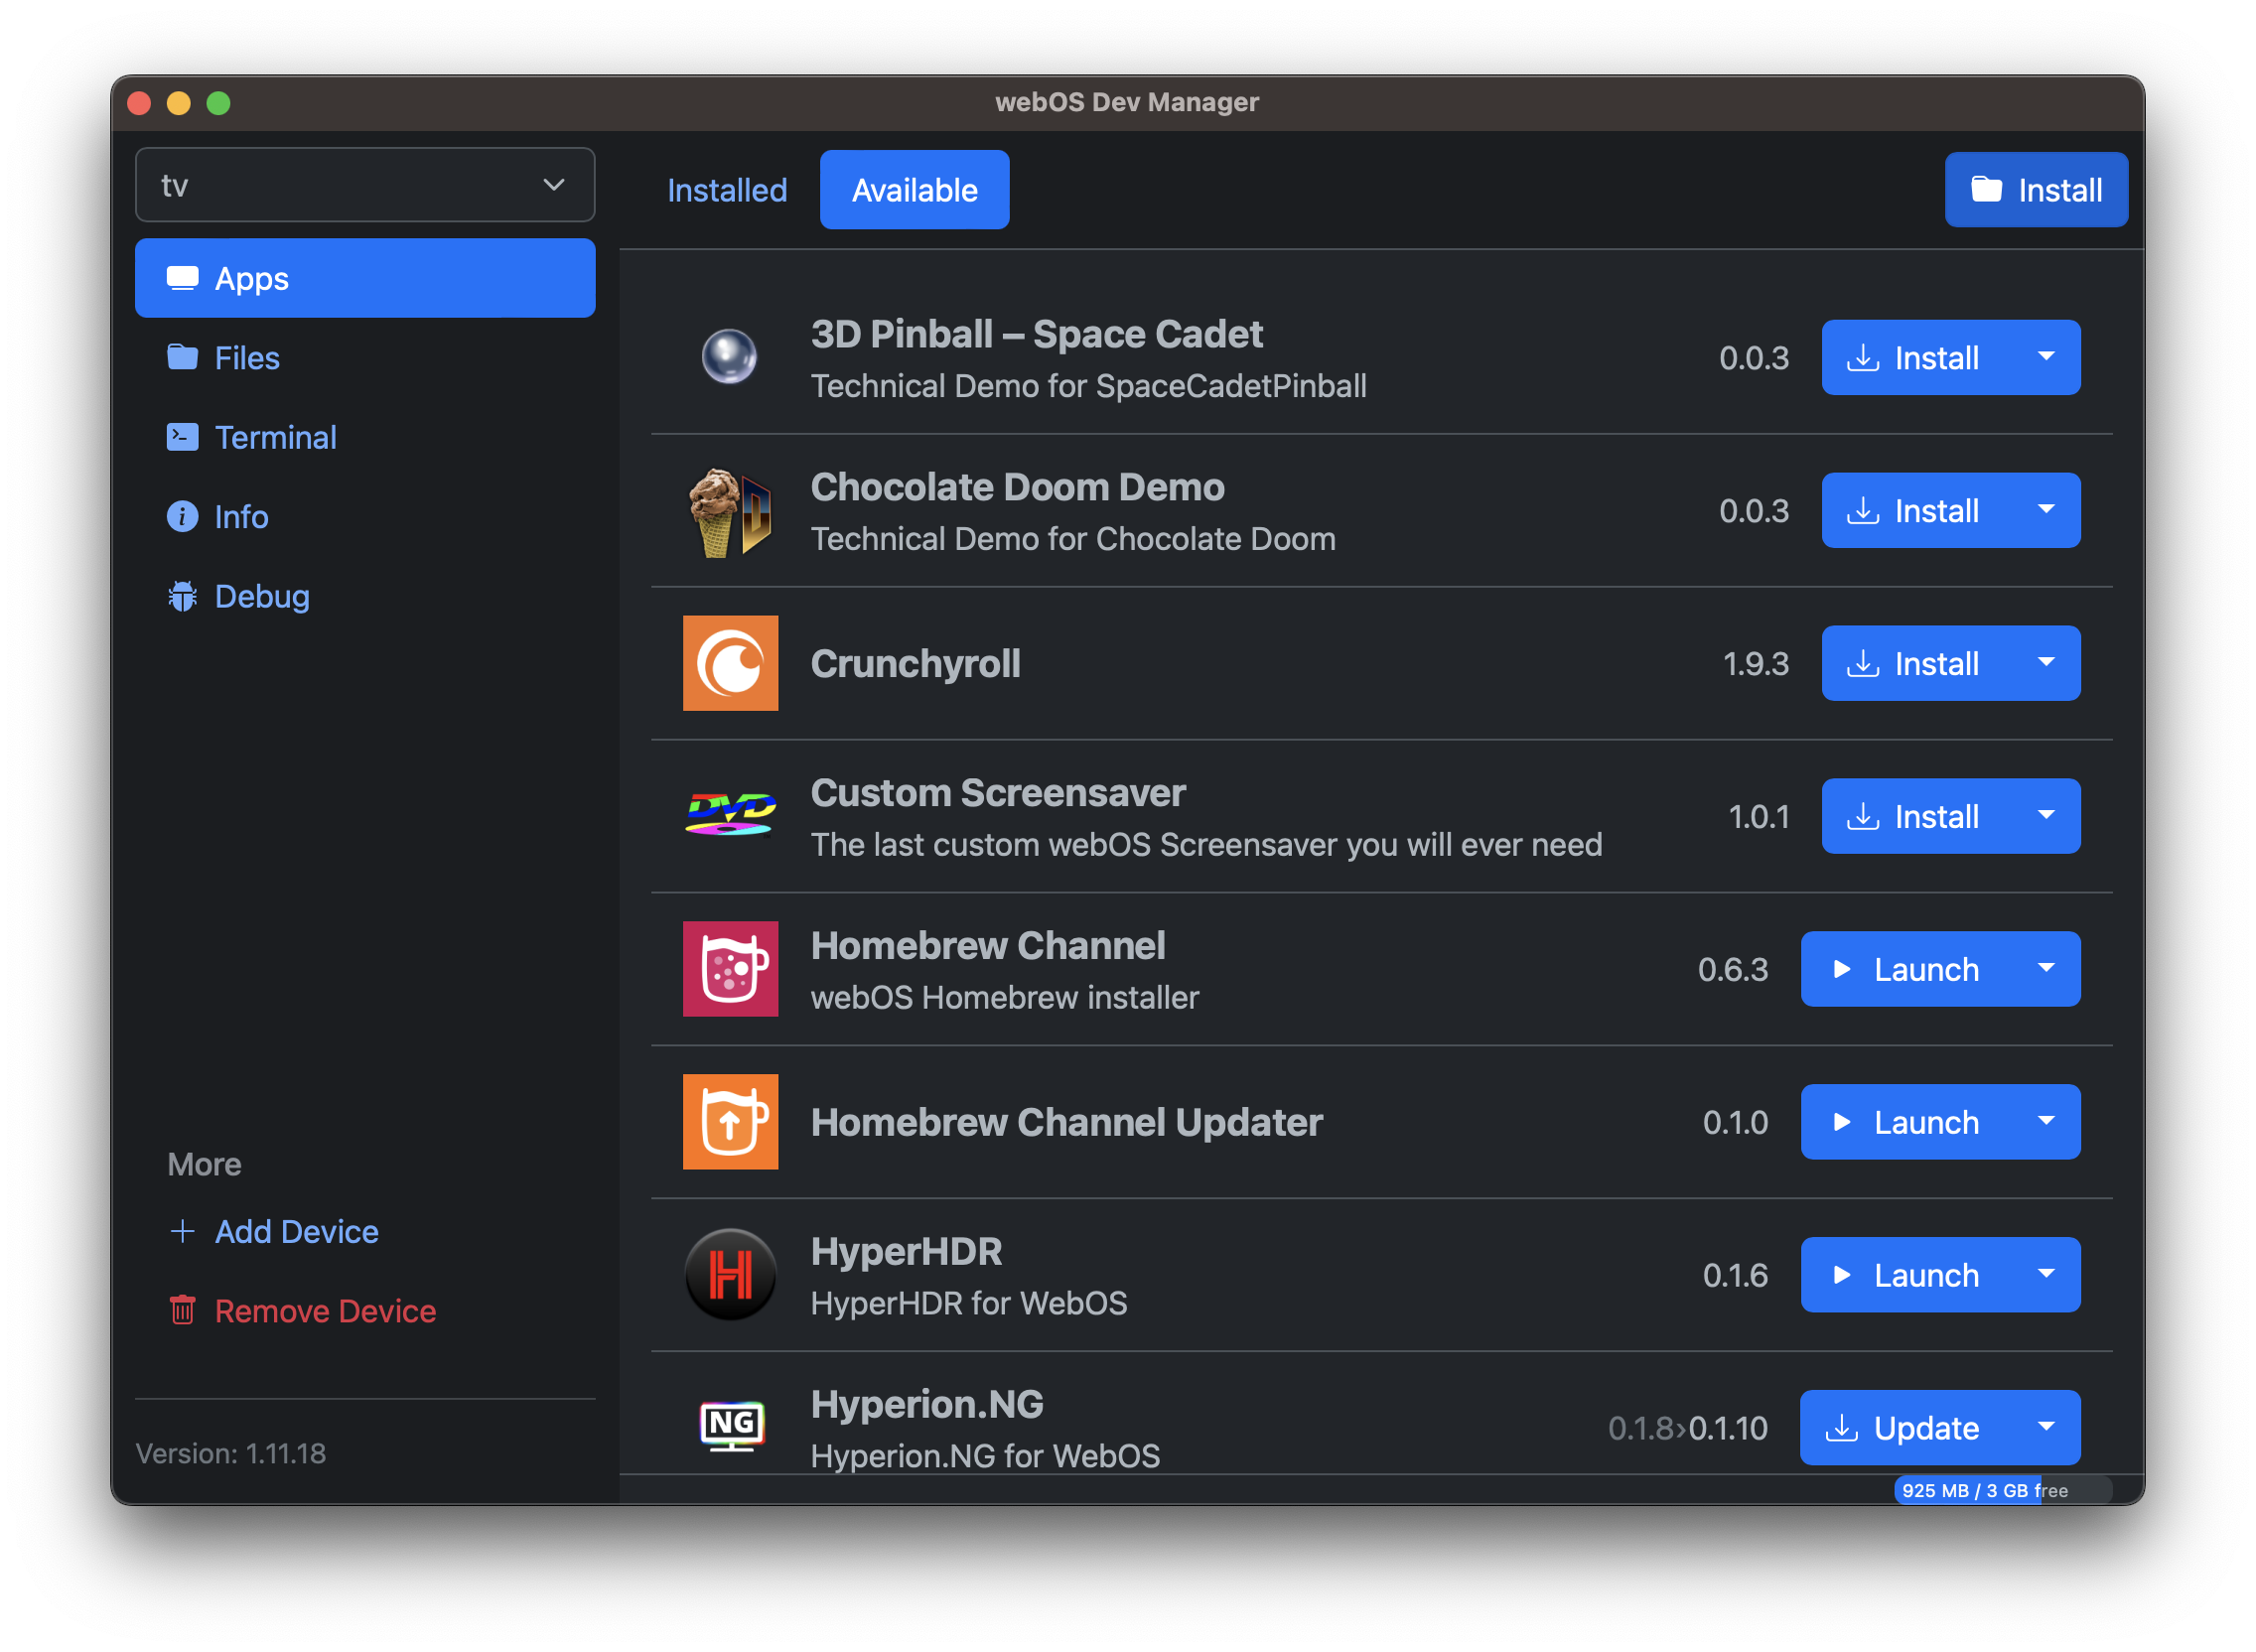
-
Wait for the installation to complete
Limitations
- Binary addons are not available from the repository
Kodi can be installed on a Raspberry pi through various methods. The most common way is to use a dedicated Kodi operating system like LibreELEC or OSMC. Follow this wiki for detailed instructions.
Configuring Kodi settings
Kodi itself does not require much configuration out of the box. However, there are a few settings that can enhance your experience.
-
Enable Unknown Sources: This allows you to install third-party addons. Go to
Settings>System>Add-onsand enableUnknown sources. Also make sure you are inExpertmode by clicking the gear icon in the bottom left corner of the settings menu. -
Update all addons: Go to
Settings>System>Add-ons>Update official Add-ons fromand selectAny repository. This ensures that all your addons are kept up to date. No matter what addon have been installed, it is important to keep them updated for the best performance and security. (This helps some addons to work properly) -
GUI sounds: If you find the default GUI sounds annoying, you can disable them by going to
Settings>System>Audio>GUI Soundscategory and Selecting fromPlay GUI soundsthe optionNever.
Mess with this if you have buffering or errors
-
Buffer mode: we gonna activate buffer mode to improve streaming performance. Go to
Settings>Services>Cachingand onBuffer modeselectOnly buffer true internet streams: HTTP, HTTPS, etc. -
Memory size: Select the number of megabytes used for buffering streams in memory. When set to 0 the cache will be written to disk instead of RAM. Go to
Settings>Services>Cachingand onMemory sizeset the appropriate value. - If you have less than 2GB of RAM, set it to64MB. - If you have between 2GB and 4GB of RAM, set it to128MB. - If you have more than 4GB of RAM, set it to256MBor higher. -
Read factor: This factor determines the max readrate in terms of readfactor * avg bitrate of a video file. This can help on bad connections to keep the cache filled. It will also greatly speed up buffering. Default value is 4x. We recommed to set it to Adaptive so Kodi can adjust it based on your cache level. Go to
Settings>Services>Cachingand onRead factorselectAdaptive. -
Chunk Size: Allows the selection of the chunk size which may improve data throughput. May aid in better playback of high bit-rate UHD files, especially on low-powered devices or slow networks. Go to
Settings>Services>Cachingand onChunk Sizeselect512KB. It should work well for most connections. If you have problems with buffering, you can try increasing it to1MBor Decreasing. its a matter of testing what works best for your connection.
Debrid Service
A debrid service is highly recommended for Kodi and most torrent-based addons. Many addons will not work without one. Beyond compatibility, a debrid service greatly improves streaming reliability and quality.
What is a debrid service?
A debrid service generates unrestricted, high-speed (often up to 1 Gbps) HTTPS links from torrents and supported hosters.
We cover debrid options in more depth on the details page.
Benefits
- Privacy: You stream over HTTPS, so your ISP cannot see torrent traffic.
- High speed: Playback no longer depends on seeders. Debrid servers fetch torrents instantly and stream to you at high speeds (often 1 Gbps). This allows smooth playback of 4K, HDR, DV, Dolby Atmos, and other high-bitrate formats.
- No VPN required: Traffic is encrypted and handled by the debrid service.
- Use beyond Kodi: You can download games, software, music, or any supported hoster/torrent file through your debrid account.
Drawbacks
Most debrid providers:
- Do not seed torrents back to the swarm.
- Limit usage to one IP at a time, so you can only use the service from one location at once.
Some premium services offer limited multi-IP support or optional seeding.
Should I use a debrid service?
It depends on your situation. Consider:
- Legal risk: If torrenting is monitored in your country, debrid (or a VPN) reduces risk.
- Seeder availability: If you often watch content with few or no seeders, debrid removes this issue.
- Your internet speed: Debrid cannot increase your own connection speed. If your internet is slow, you may still buffer.
When you don’t need a debrid service
If torrenting is not an issue in your country, the content you watch is well-seeded, and your internet is fast, you can stream without debrid.
When you should get one
If you experience buffering despite having fast internet, or you want reliable playback of very high-quality content, a debrid service is highly recommended.
Which debrid service should I use?
I receive free days on Torbox only if you sign up through the link provided. This is at no extra cost to you and is a way to support me. Also you get free days (if you sign up through my link, only valid to first time purchases) so it's a win-win situation. :)
There are many debrid services available to use. Here is a list of some of the two most popular ones. If you have already chosen a debrid service, you can skip to the setup instructions. Otherwise, I will go through the factors you should consider when choosing a debrid service.
- Torbox (My recommended debrid service)
- Real-Debrid
When choosing a Debrid service, the factors you have to consider are cost and the value you get from it which is made up of its optimality and userbase.
I recommend coming to your own conclusion by reading the information below, in addition to your own research.
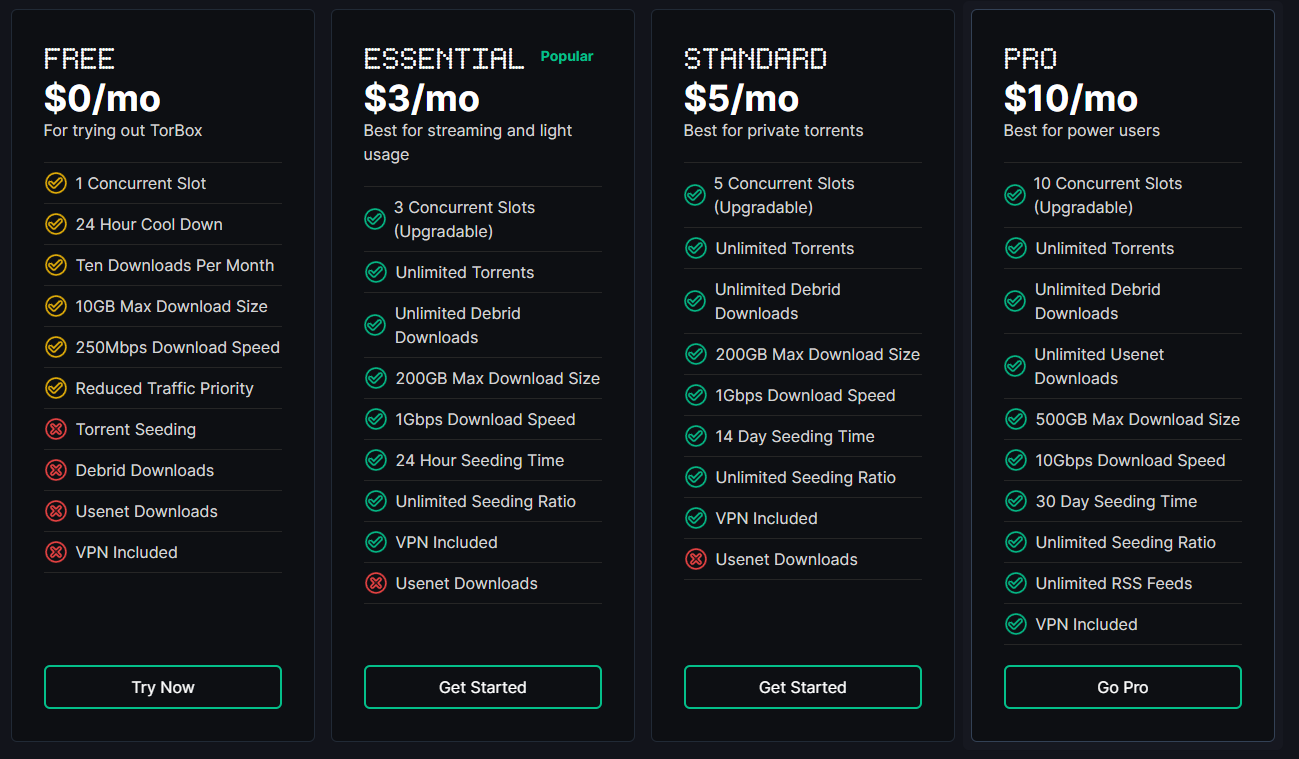
Cost
To compare the cost of each debrid service, I made a table of the prices of each service for different durations.
| Duration | Torbox (Essential) Price | Torbox (Standard) Price | Torbox (Pro) Price | Real-Debrid Price |
|---|---|---|---|---|
| 15 Days | ❌ | ❌ | ❌ | $3.49 |
| 30 Days | $3.00 | $5.00 | $10.00 | $4.66 |
| 90 Days | $9.00 | $15.00 | $30.00 | $10.48 |
| 180 Days | $18.00 | $30.00 | $60.00 | $18.63 |
| 365 Days | $36.00 ($33/y if paid annually) | $60.00 ($55/y if paid annually) | $120 ($110/y if paid annually) | ❌ |
Both services have a rewards program that allows you to earn free days.
- Torbox has a referral program that gives you +7 days x Months purchased for each person that signs up through your link. (only for first time purchases)
- Example: If 2 persons sign up through your link and you purchase a 3 month subscription, you get 2 _ 3 _ 7 = 42 free days.
- Real-Debrid has a points system where you earn points. that can be redeemed for free days.
- 1000 points = 30 days
Optimality
Optimality refers to your proximity to the service's servers. The closer you are, the faster the download speeds and thus the better the streaming experience. The download speeds you get directly determine the quality of the stream you can watch.
This is different for everyone. Giving my experiences with each debrid service would not be helpful as it is dependent on your location as well as many other factors.
Therefore, make sure to carry out speed tests to determine the best service for you.
The speed tests for each debrid service can be found here and on their website too.
While a debrid service is unlikely to be the bottleneck in your streaming experience, TorBox has the fastest servers (80gbit NVME) which no other service can offer at prices as low as theirs.
Userbase
This is important as the more users a debrid service has, the more cached torrents it will have. Cached torrents are what you rely on when streaming content through Kodi.
A larger userbase means more cached torrents, with Real Debrid leading However, the other debrid services will still have a lot of popular torrents cached.
In this regard, TorBox is not as good as Real Debrid. It has a smaller userbase due to being a newer service.
However, many people are now switching to TorBox due to being cheaper, addons having accurate cache indicators, and not having IP restrictions.
Most popular content will be cached on TorBox, but if you look for stuff that is not as popular, you may not find it cached.
Addon Support
Addon support should not generally be an issue as almost every addon supports most major debrid services.
Find a full table of addons and supported debrid services here.
Additional Features
Another thing to consider is the additional features that some debrid services offer.
I previously discussed some of the limitations of debrid services, namely the lack of seeding and the restriction to one IP address. As I said before, there are some exceptions. I will now go through them.
-
IP Restrictions:
- TorBox has no IP restrictions whatsoever. You can use it on as many devices as you want. This is great for people who want to use it on multiple devices or share it with family members.
- Real-Debrid restricts usage to one IP address at a time.
-
Seeding:
warningThe debrid services below will seed the torrent if it hasn't been cached already. In the case that its already been cached, they may not seed it, and other users can stream this cached torrent too.
- TorBox offer a option that can seed for up to an unlimited amount ratio for up to 30 days depending on your plan. This makes it the best debrid service for seeding. (The amount of torrents you can actively seed is dependent on your plan, referred to as your
Concurrent Slots) - Real-Debrid does not seed torrents.
- TorBox offer a option that can seed for up to an unlimited amount ratio for up to 30 days depending on your plan. This makes it the best debrid service for seeding. (The amount of torrents you can actively seed is dependent on your plan, referred to as your
-
Usenet:
- TorBox offers access to Usenet on its Pro plan ($110/year or $10/month). This is a unique feature that is not offered by any other debrid service. (Usenet is explained in more detail later. It is simply another way to access more content)
- Real-Debrid does not offer access to Usenet.
-
Custom Indexers:
- TorBox allows you to add your own instances of Prowlarr/Jackett/NZBHydra2 to be used for searching of content, this can be enabled for POV. This lets you use your private trackers/indexers easily with Kodi.
- Real-Debrid does not offer this feature.
Setting up a debrid service
Setting up a debrid service in Kodi is straightforward. Here are the general steps to follow:
- Real-Debrid
- TorBox
- Go to Real Debrid's website
- Click Sign Up to create an account
- Go to the Premium Offers page
- Choose a package and subscribe.
 Torbox is a relatively new debrid service but it is unique in that it offers a lot more.
It offers :
Torbox is a relatively new debrid service but it is unique in that it offers a lot more.
It offers :
- A way to seed your torrents for up to 30 days to an unlimited ratio
- Access to Usenet (Usenet is explained in more detailed below. It is simply another way to access more content)
To set up a Torbox account, follow these steps:
-
Go to Torbox's website
-
Click
Get Started For Free NoworLOGINin the top right corner to create an account. -
Click
Don't have an account yet?at the bottom of the page. -
Fill in the email and password fields and click
Continue -
You will be sent an email to verify your email address. Click the link in the email to verify your email address.
-
You will then be taken to the Dashboard.
-
Go to the Subscription page and choose a package.
infoYou may get an alert saying
Do you want to use this referral code? If you already have a code, this will replace it.This is because the above link has a referral code in it.You may also enter this referral code manually at the bottom of the page:
74c57ae2-94eb-48fd-9812-856332b87169 -
Now you can choose the plan you want. You can choose to pay a subscription or a one-time payment. A yearly subscription has the best value.
noteTo access Usenet and the 30 day seeding time, you need to buy the highest tier package - the
Propackage. -
Once you have decided on a package, click
Subscribe -
Then, follow the steps at the payment page to complete your purchase.
Usenet
Usenet is optional for Kodi users.
Most people will not need it and can skip directly to Setting up your addons.
If you’re unsure, read the Should I use Usenet? section below.
What is Usenet?
Usenet is a long-standing, decentralised communication system made up of thousands of “newsgroups.”
You can think of a newsgroup as a forum where users post messages and files.
For Kodi, the relevant posts are binary files (NZBs) that contain video content.
Many of the highest-quality releases—larger sizes, untouched disc rips, niche content—appear here before or instead of torrents.
Each newsgroup has its own topic, rules, and moderators, similar to subreddits on Reddit.
Providers
To access Usenet, you need a Usenet provider.
They host the servers that store newsgroup content and give you access to download from them.
Providers are paid services due to the storage and bandwidth costs required to keep copies of all newsgroup data.
While all providers theoretically mirror the same content, real-world differences exist due to:
- DMCA/takedown policies
- Corrupted uploads
- Varying retention times (how long they store files)
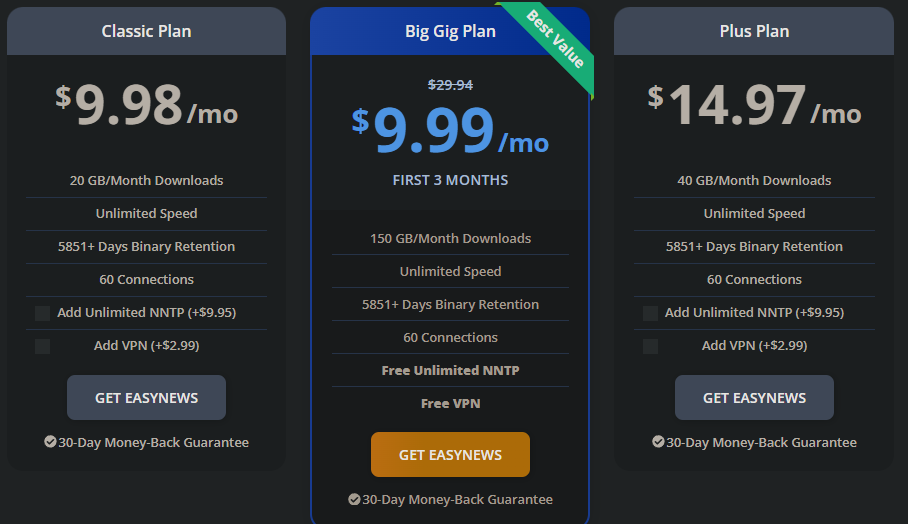
For Kodi, we focus on Easynews and TorBox, since both have community-supported addons.
When choosing a Usenet provider, consider:
- Data limits: Some plans have monthly caps. Choose based on how much you plan to download.
- Retention: How many days (or years) of content the provider keeps. More is better.
- Connections: Number of simultaneous connections. This affects multi-device usage and download concurrency.
Indexers
Providers often include built-in search tools, but these may miss content.
Indexers are independent websites that crawl and index newsgroups.
They usually offer better search accuracy and more detailed results.
Using multiple indexers increases your chances of finding specific or obscure content, and some indexers specialise in particular types of releases.
Should I use Usenet?
The main reason to use Usenet is to access:
- Extremely high-quality files (larger sizes, full disc backups)
- Niche or regional content that may not exist on torrents
- Content unavailable or poorly seeded on P2P networks
Like debrid services:
- Usenet is very fast, often limited only by your own internet speed.
- Downloads use HTTPS/SSL, so ISP notices are not an issue.
- You can use Usenet for anything—not just Kodi—if the files exist on the network.
However, for most people, torrents + a debrid service are enough.
Usenet typically becomes useful as:
- a backup when torrents fail,
- or the only option for certain regions (e.g., much German content).
If you’re already satisfied with your debrid service and have no issues with buffering or missing content, Usenet is not necessary.
But if you want maximum completeness or a fallback option, it can complement your setup.
How to use Usenet with Kodi?
Setting up Usenet in Kodi is similar to setting up a debrid service.
There are two services that allow you to use Usenet with Kodi:
-
Easynews
Easynews is a Usenet provider with addons available. These addons allow you to access content found through Easynews' internal search engine. However, you are limited to the content that their search engine can locate.- Easynews allow you to stream the usenet files directly from them. This does, however, mean that Easynews streams can take a long time to initially load, but once loaded, it usually doesn't buffer.
-
TorBox
TorBox is a debrid service that includes Usenet access as part of itsPropackage. It uses undisclosed providers and indexers to offer Usenet content.- TorBox allows integration with your own NZBHydra2 instance, enabling the use of custom indexers.
- Usenet downloads via TorBox must be cached before streaming, similar to torrents. However, Usenet downloads typically cache much faster, often within a few minutes, as they are not dependent on seeders.
I will now go through the setup for each of these services.
- Easynews
- TorBox
- Head to Easynews's signup page
tip
Use one of the following deals to get a discount on your subscription:
- Choose a package, fill in your details and subscribe.
- Complete the payment and signup process.
To set up a Torbox account with Usenet support, follow these steps:
-
Go to Torbox's website
-
Click
Get Started For Free NoworLOGINin the top right corner to create an account. -
Click
Don't have an account yet?at the bottom of the page. -
Fill in the email and password fields and click
Continue -
You will be sent an email to verify your email address. Click the link in the email to verify your email address.
-
You will then be taken to the Dashboard.
-
Go to the Subscription page.
infoYou may get an alert saying
Do you want to use this referral code? If you already have a code, this will replace it.This is because the above link has a referral code in it.You may also enter this referral code manually at the bottom of the page:
74c57ae2-94eb-48fd-9812-856332b87169 -
To be able to access Usenet, you need to buy the highest tier package - the
Propackage. -
Click
Subscribeon thePropackage. -
Then, follow the steps at the payment page to complete your purchase.
Setting up addons
Now that Kodi is set up and you have your debrid service (and Usenet if needed) ready, you can proceed to set up the addons.
How to install addons
Addons in Kodi are installed through repositories. A repository is simply a collection of addons that can be installed from a single source. To install an addon, you first need to add the repository that contains the addon. Once the repository is added, you can then install the addon from within Kodi.
Follow the instructions exactly as stated in the addon installation guide.
Streaming providers addons
These addons are the backbone to our on-demand streaming experience. They provide the video content that allows us to watch anything we want.
You can have a look at this Recommended kodi addons to view the available addons.
Please refer to the key below to understand the different types of addons.
| Key | Addon Type | Explanation |
|---|---|---|
| 🌐 | HTTP | Direct links from centralised servers. Generally lower quality due to hosting/bandwidth limits. |
| ☁️ | Debrid | Streams torrents via HTTPS through a debrid service. Higher quality (4K, DV, HDR) and reduced buffering without exposing your IP. |
| 📰 | Usenet | Links from Usenet newsgroups. Great for niche content and large, high-quality files with very fast speeds. |
POV ☁️ 📰
- Installing the repository:
- Go to
Settings>File Manager>Add source - Enter the URL of the repository (
https://kodifitzwell.github.io/repo/) and give it a name (POV Repository). - Go back to the main menu and select
Add-ons>Install from zip file - Select the repository you just added and install the zip file.
- Go to
- Installing the addon:
- Go to
Add-ons>Install from repository - Navigate through the repository categories to find the addon. Look for:
- Video add-ons
- Select POV and click
Install.
- Go to
Description
POV is a Kodi addon that scrapes multiple high-quality sources to provide reliable streaming links for movies and TV shows. It supports integration with major debrid services, enabling fast, buffer-free playback from premium sources.POV includes a built-in catalog of popular movies and TV shows, removing the need for a separate addon to browse trending or featured content.
For personalisation, POV can be linked with MDBlist or Trakt to sync your watchlist, watched history, and access your personal lists and recommendations across devices.
Configuration
POV have a lot of configuration options to tailor the experience to your preferences. so we gonna cover the most important ones here.When you open POV for the first time, the page will look like this:
First, you need to set up your services. Click on Settings, then go to SETTINGS: My Services and there you can add yours services.
After setting up your services, go back to settings and go to SETTINGS: POV and there we gonna configure POV itself.
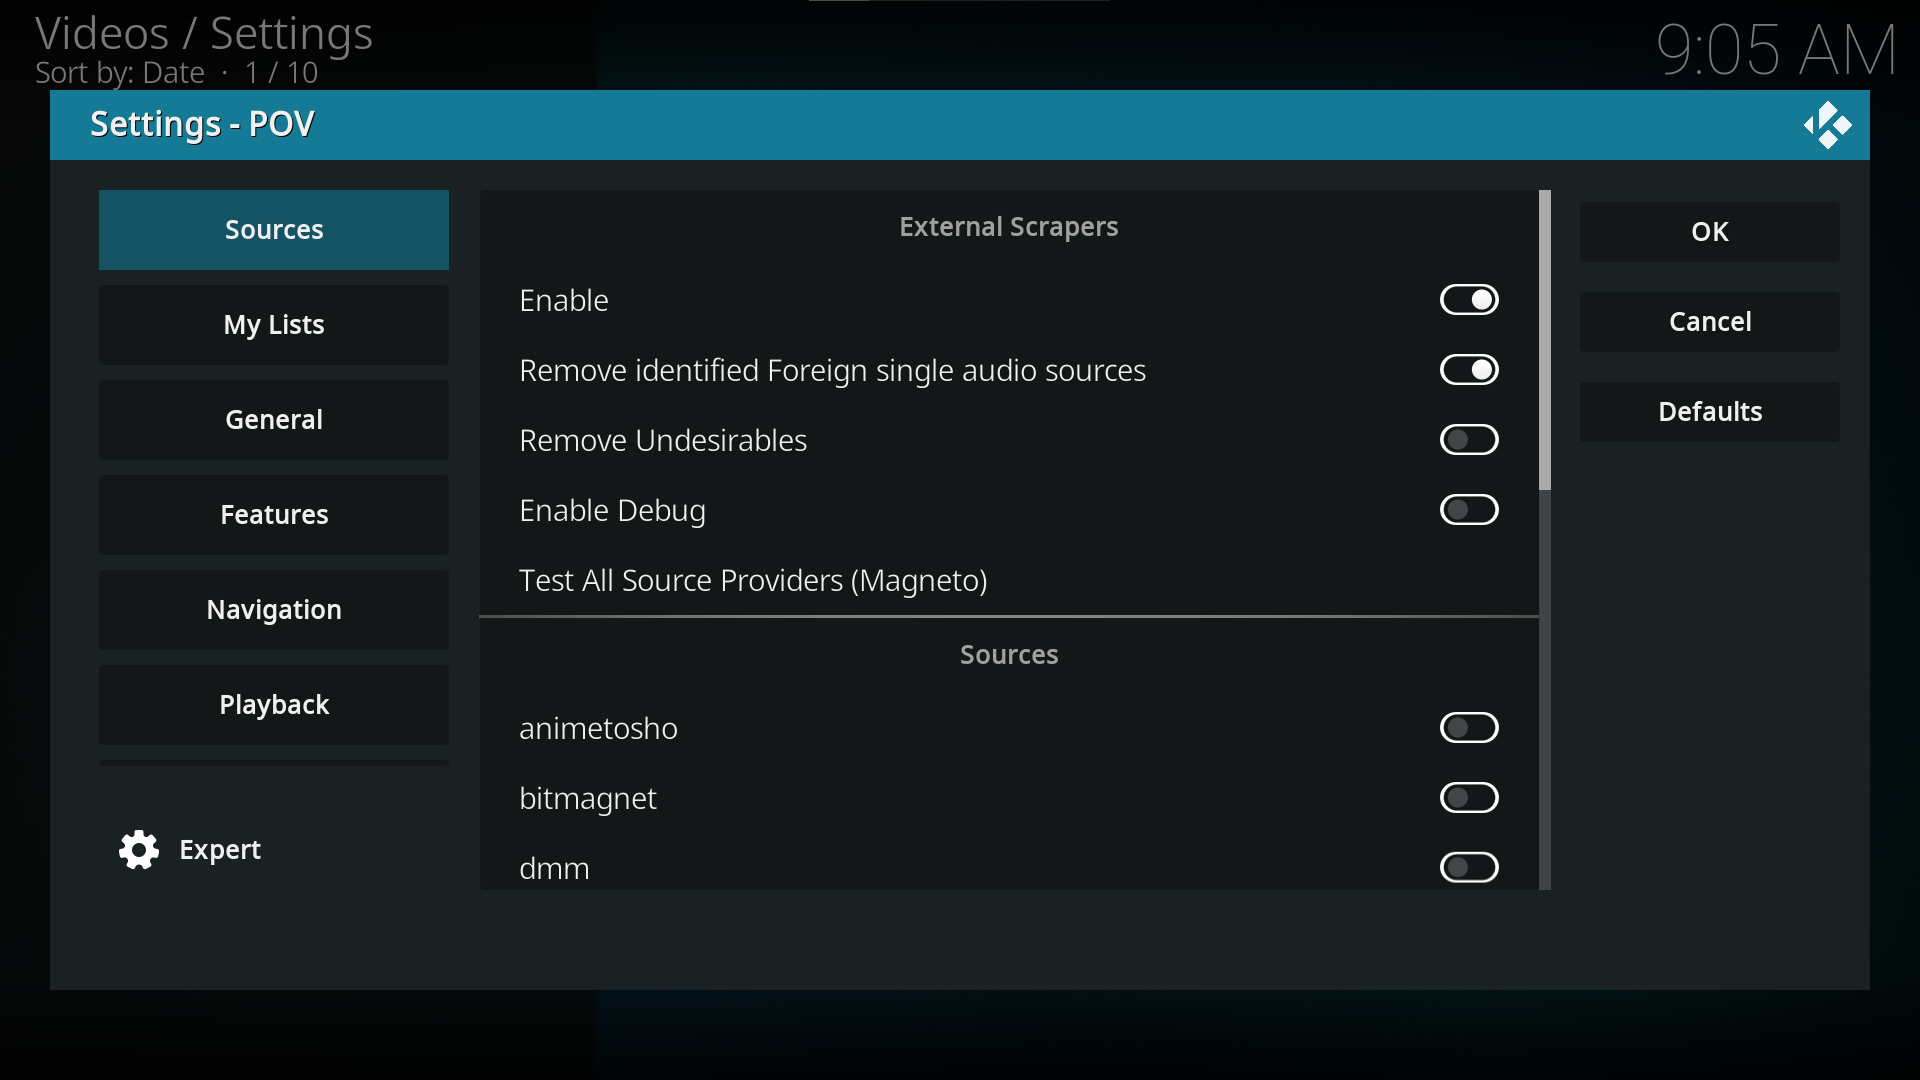
We gonna have 8 sections to configure:
- Sources: Here you can configure which sources you want to use, i'd recommend first doing the
Test All Sources Providersto see which ones work best for you, then you can enable/disable the ones you want. - My lists: This section leave it as default.
- General: Here you can leave as default, but here i'd recommend enabling
Auto start POV when Kodi starts, Also you can enable/disable theHide watched items widgetsthis will hide any movie/serie/anime that you have already watched. - Features: Here we gonna have a plenty of options to enable/disable.
- Watched Indicator: This is where you can select which tracking service you want to use for the watched indicator. (Trakt or MDBlist)
- Next Episodie: Leave as default.
- Extras: This is a menu that you can access leaving long press on a movie/serie/anime, this is useful to access trailers, reviews, etc.
- Open POV Extras Menu When Select: Enable this if you want to access the extras menu when you select a movie/serie or both, you can set at none and access it with long press.
- Enable Content For Extra List: Here you can enable/disable which content you want to see in the extras menu.
- Navigation: Leave as default.
- Playback: Here you can configure the playback settings.